Tuesday, February 17, 2015

Just A Stay At Home Mom?!?!?

Just A Stay At Home Mom?!?!?
 
For the past 4 years, I have had the fortunate experience to be able to be a stay at home mom. It's a job that is 24 hours a day, 7 days a week and 365 days a year and 366 days during leap year. There are no sick days or vacation days. No time clock to be punched. There is no monetary paycheck that you receive every week, every 2 weeks, or every month.
 
So many of my friends think that since I'm a stay at home mom, that I have all the time in the world. That life is a piece of cake for me because I don't have an employer to report to. Our days are spent tending to the needs of our family. If you want to give us a fancy work title, than it would be an enormous list - office manager, accounting, cook, dish washer, housekeeper, maid, teacher, nurse, seamstress, chauffer, party planner, and guidance counselor. The list could go on and on and the tasks are never ending.
 
Last Friday night, mommy needed a break. It's not often that I do go out for an evening, because when I do, it's filled with phone calls or texts and just the stress of wandering if the house will still be standing when I return home. So I happened to find a perfect movie On Demand - Mom's Night Out.
 
In "Mom's Night Out," Sarah Drew plays Allyson a stay at home mom of 3 kids. The movie portrays a mother who is in desperate need of a night out away from the kids. It was true to life how so many moms feel at the end of the day after getting the kids put down for the night. It's generally when we finally get a break for ourselves, but yet there is still jobs around the house to be done. It became quite a comic adventure when she plans an evening away with two of her friends. Even though what they dealt with doesn't happen in a normal mom's night away from the house and family, the stress and disturbances have become a part of life.
 
So when you have a friend who is a "STAY AT HOME MOM," remember that she is a normal person. She has feelings, needs a break, and has a heart just like you. We need adult conversation and a chance to not be singing ABC songs or watching kids cartoons. Our paychecks come in the form of hugs, kisses, art work, and little accomplishments. It might not be the job for you, but it's the job for me. I wouldn't trade spending the day with my son to sitting in an office any day.
 
I'm proud to say that I'm a MOMMY and the best job in the whole world for me.


Monday, February 16, 2015

Mickey Mouse Birthday Party

A Mickey Mouse Birthday Party
February 1013
 
 
Our little boy was growing up and it was almost his 2nd birthday. There wasn't much debating about the them for his party. Excitement always filled the room when Mickey Mouse Clubhouse was coming on. Everything in his life seemed to be Mickey - clothes, pajamas, stuffed animals, blankets and toys.
 
This party was no different than his first. We knew that we could run out to the store and purchase all the party supplies that had Mickey and characters plastered all over them, but where was the uniqueness? We collected pages of ideas and started letting our own creativity to flow.


Since we were still in our apartment, we wanted out guests to not be confused about which door to come to. We went to the local Dollar store and picked up a few supplies to make a wreath for the door. It was simple and able to include our toddler in the process. Items you will need - foam wreath, crepe paper, balloons, and straight pins.
 
First - wrap the wreath in your desired crepe paper. I suggest crepe paper since it is much easier to push the pins thru.
Second - pick a balloon, place it on the wreath, and then push a pink thru the center. Proceed until you have the front and outside of the wreath covered in balloons.
Third - Add some spice. We found a birthday ribbon and placed in on the wreath along with a number 2 shaped candle (we cut the wick off).
 
After his birthday, we hung it in his bedroom on the wall.
 
No Mickey Mouse party would be complete with having ears, so this became our next task. We picked up packages of party cone hats at the dollar tree. We took black construction and cut out circles and then glued them on to the side of the hat for the ears. We had them placed on a shelf next to the front door so that guests could pick them up on the way inside.
 
Time to start on some easy decorations that kids can help with. We wanted to bring out the fun in the party. We wanted to keep it simple.
 
First on the list was paper chains. Cut strips of construction paper. Take your first strip and make a loop glue the ends together. Take your next strip and insert it thru the first loop and then glue the ends. Repeat this until you have your paper chain at the desired length. We made several of these to hang around in various places.
 
We made crepe paper wind socks. Took a piece of cardboard and cut several squares (I believe we made ours 5" squares) but you can decide what's best for you in the party space. Cut a very small hole into the center of your square. Put a piece of ribbon thru the hold to hang your wind sock when complete. Cut strips of crepe paper and tape the end to the top of your square. We made several of these to hang around the rooms.


Next was a birthday banner. We used card stock to cut squares in the party colors. We printed out letters with Disney characters on them. Cut them down and glued them to the cardstock squares. We punched holes in the top corner of each square and then used ribbon to tie them together. We hung the banner over our mantle and decorated the mantle with ribbon curls, character figurines and a couple of his favorite stuffed characters.


We kept the party food simple and thought about the age of our guests. We made tent cards with the food description and placed it near the food. We also kept to the theme of the party with having the following foods:
* Clubhouse Sandwiches
* Pluto's Hot Diggity Dogs
* Goofy's Cheeseballs
*Minnie's Cotton Candy
* Donald's Popping Corn
*Daisy's Drink Stand
*Mickey's Grand Cupcakes


We didn't want our guest to leave without a thank you. We did up favor bags for the kids and for adults. We picked up several items from the Dollar store for the bags.
 The adult bags (pictured above) had hand sanitizer wipes and a few pieces of candy.
 The kids bags (pictured above and below) had coloring book, crayons, puzzle, bubbles, paddle ball, punch balls, and some candy.
 
The 2nd birthday was again a success. Everyone had a great time. But most of all, the birthday boy himself was very happy.


Saturday, February 7, 2015

The Pirate Ship Cake

The making of a Pirate Ship Cake
February 2012


One of my favorite elements of my son Benjamin's first birthday party, was his Pirate Boat Smash Cake. When we were planning his party, the smash cake was at the top of the list. We wanted something unique and tied in to the theme. We had found several different boat cakes and started making our own sketches.

The week before the party, we went to our local Kroger grocery store. To save us time, we ordered a half sheet cake undecorated in marble. If your a little more confident than I was, a 1/4 sheet cake would work as well. They let our son taste the different icings - buttercream and whipped, so we would know what he preferred.

The day before his party, we picked up the cake. The cashier looked at us funny and even questioned if we knew we were buying a cake that wasn't decorated. We knew exactly what we were doing.

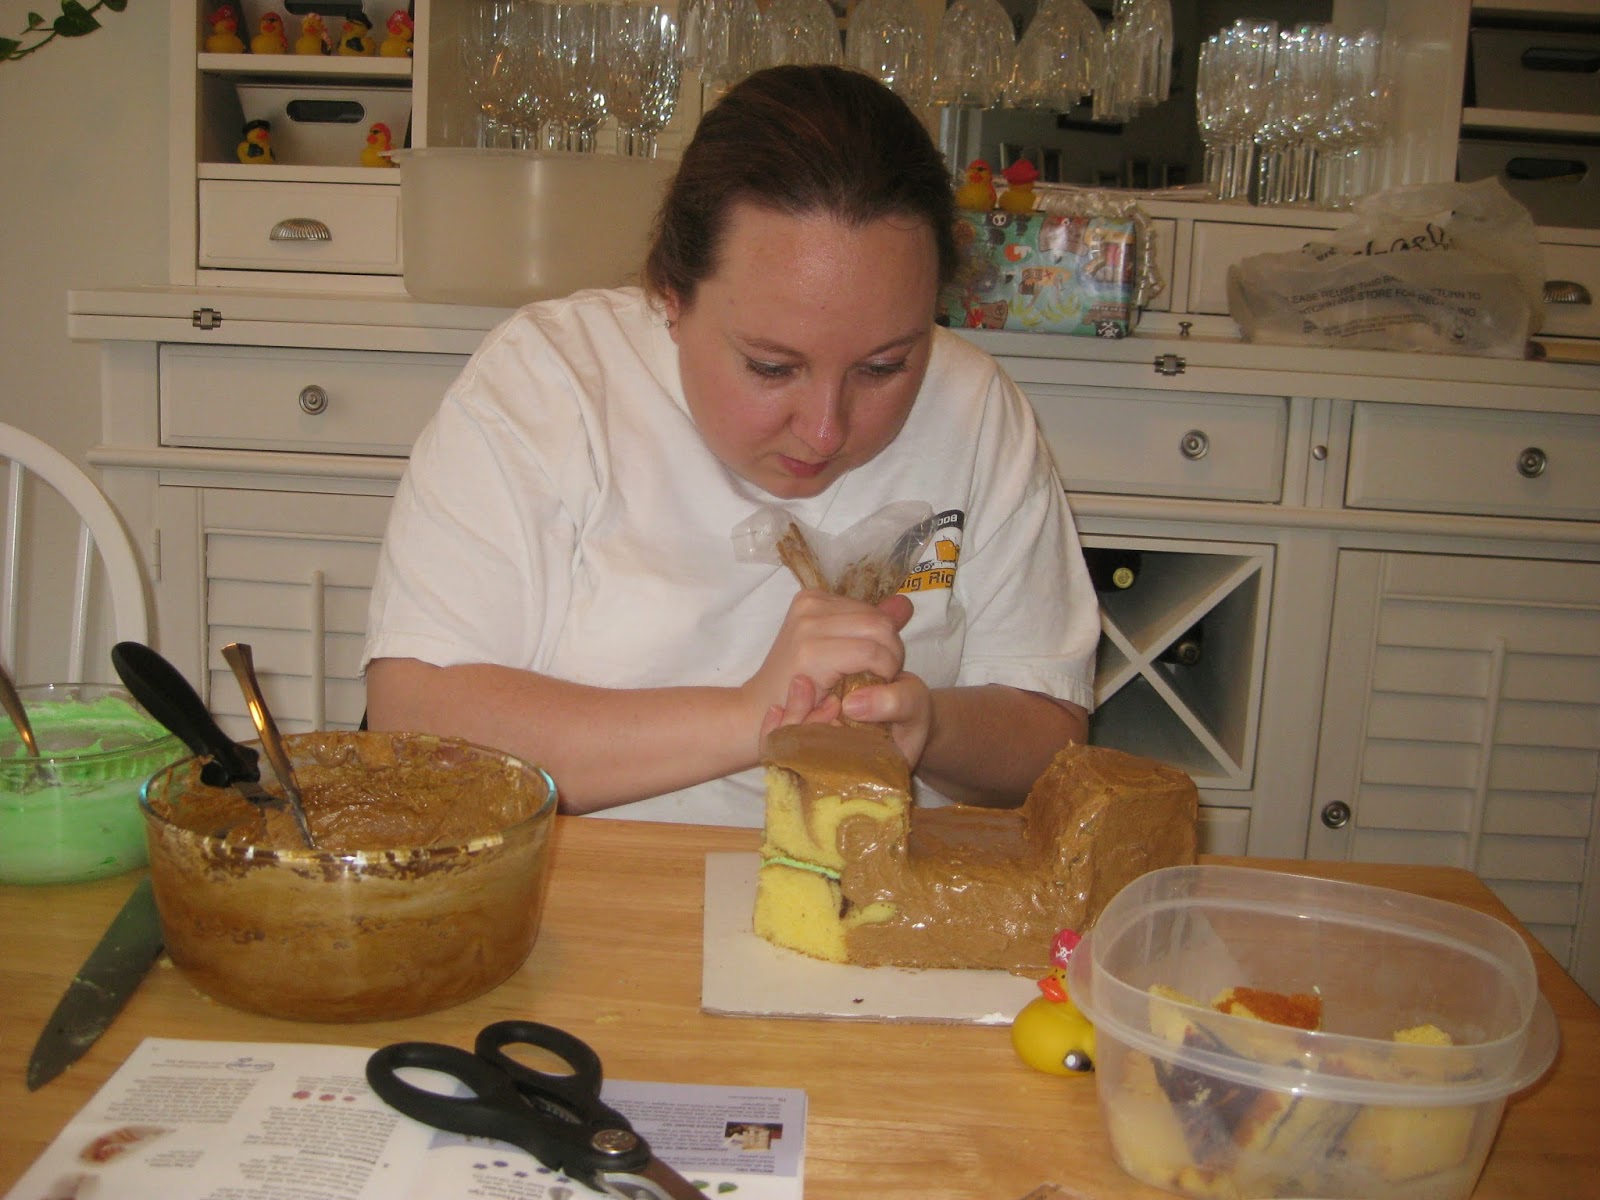
We got home with our cake that would soon turn into a masterpiece only to be destroyed by our soon to be 1 year old. Since he preferred the buttercream frosting, I followed the  Wilton buttercream icing recipe. I made a couple of batches so that I would have enough, especially with adding color. I mixed 1 larger bowl in brown, small bowl each of a lime green and light blue.
 
Since we were going to be putting the cake onto the high chair tray, we purchased cake board and cut it down so that it would fit into the tray. You could always use a very sturdy piece of cardboard.
 
 
I took the sheet cake and cut it into thirds.
 
 
I took 1 of the rectangles and cut it into thirds again. I pulled the center part out and put it to the side. The back 3rd, I cut it at an angle to use on the back of the ship. I used the green frosting and squeezed it onto my newly shaped squares to stack on top of my base. Be careful not to spread it to close to the edges so it doesn't run out.


Now that the front and back part of my ship was stacked, I gently cut the front pieces on each side to make a slight point. So far, my cake was looking just like a ship.


I moved my newly formed boat onto the cut cake board. Now the real fun begins. I pulled out the brown icing and started to cover the boat. To make it a little easier, I put the frosting into a cake bag with large tip and begin covering the cake. If you don't have a frosting bag, use a heavier weight quart size storage bag. Smooth the icing over the entire cake with a knife.


Once the boat was covered in brown, I used the blue frosting. I used a larger tip and made smaller strips around the boat so that it would appear it was in water. After getting the main water surrounding the boat, I darkened the blue a tad and added the darker as an accent. I also darkened the brown a bit more and trimmed the boat using a smaller tip.


Since my son was in the Cheerio phase, I used cheerios to trim the boat. I wanted to make sure that there was something on the boat that would encourage him to reach and touch the cake. The same with the pirate ducky. The little white piece is a candy sugar stick. It was left over from Halloween candy a few months prior to his birthday.


As you can see, the pirate cake looked adorable in pictures, leaving a very memorable birthday for years to come......


And you can see.....it was definitely a smash of a good time.


Hope your pirate ship cake turns out just as nice. Pretty simple and easy to do. And I must add that I have never had any cake training, just practice and creativity in the kitchen.


Benjamin First Birthday

Pirate First Birthday Party!!!
February 26, 2012
 
 
It was a couple of months before our little boy Benjamin was turning a year old that we began looking at party supplies. It was crazy to think that the first year was coming to an end. As we looked at the stores and online, everything for a little boys first birthday was sports theme or baby animals. The themes were cute, but not fitting to his little character. He enjoyed watching the Disney show Jake and the Neverland Pirates and no decorations to be found. So we took to the internet for ideas of a pirate birthday. We still wanted it to be cute and use first birthday decorations. After getting several ideas on how to keep a pirate themed party appropriate for a 1 year old, the planning started.
 
I used Photoshop to create a 1 of a kind birthday invitation. Not just a "your invited" but something that would become a keepsake for family and friends sharing this special day with us.


We found some really cute pirate party paper products using blues and greens. We were thrilled as we didn't want to use red and black. Bringing in color was the key.
 
 
A couple weeks before the party, we started assembling party favor bags. We used plain black plastic bags. Most items were ordered off of orientaltrading.com  We had a wooden box that looked like a treasure chest, so we put all the favor bags in it and placed it next to the door so that we wouldn't forget to hand them out to guest as they left.
The label we created for the bags.
 
 
The party favor bags included some of the birthday boys favorites
* Candy - smarties, fun dip, and chocolate gold coins.
* Bubble bottles with Skull lid
* Party beads
* Pirate Tattoos
* Pirate Rubber Duckies


As with most first birthday parties, it's a little difficult to do games. We found a little wooden momento box that we used as a treasure chest. We placed fun items in the box and let the kids dig thru and pick their treasure. We also had a Jake and the Neverland Pirate DVD that we had playing on the tv for the kids to enjoy.


Kids choosing their treasure.
 
 
The party decorations were simple as well. Baby blue and lime green crepe paper streamers and balloons.


The food and cake table decorated. 
 
 
We decorated the mantle with our favorite picture from each of his milestone portrait settings.
 
Again, some blue and green crepe paper streamers to decorate our hutch.


When it comes to food, so many people plan what to eat and think of themselves. We thought about what most kids would enjoy and tried to keep it healthy as well.


We ordered a chicken nugget tray from Chik-Fil-A and made fruit skewers. 


A variety of chips was available for the party guests to choose from. Included many kids all time favorite of Cheetos and Sun Chips for those a little more health conscious. We didn't want anyone to feel excluded.
 

 We used a blue Hawaiian Punch to serve the guests. We also had water and coffee available.


 We went to a local grocery store and ordered a pirate themed cake to serve to the guest.


Now for the best part of a first birthday - the cake smash. We made a cake to look like a pirate ship. We wanted something that would look great and pictures and be memorable for us. I will do a separate blog with details on how we made the cake. It was quite easy and appeared to be a great smash.